


If you, dear reader, are not a web designer and have ever needed to upload an image to a website, there is a good chance you did it incorrectly.
Do not be mad at me—or at yourself. It is completely understandable.
However, the truth is that I encounter this problem very often: websites overloaded with 5 MB PNG images that were uploaded without any kind of preparation or optimization.
Does that sound familiar? Do you suspect this might be happening on your website? Then keep reading. This article is for you.
On the other hand, if you are already an experienced web designer, what I am about to explain probably will not teach you anything new. You should already have this under control—but you never know. You might still learn something.
People who are not web designers often find themselves managing websites, publishing blog posts, updating pages, and, of course, uploading images.
The good news is that optimizing images before uploading them to a website is much easier than it may seem. You simply need to understand a few basic concepts and use an image-editing tool that makes the process easier.
In this article, I will explain what it really means to optimize images for the web, why it matters, and how to do it correctly—even without advanced technical knowledge.
We will do it using a free tool called XnConvert.
If reading is not your thing and you prefer a more visual explanation, the following video covers the same information included in this article.
Watch the video: How to Optimize Images for the Web with XnConvert (Spanish)
Why Is It Important to Optimize Images Before Uploading Them to a Website?
Many of you—not me, obviously; I am a professional 🤓—upload images to your websites directly from your phone, camera, or an image library without making any adjustments first.
This is especially common among employees and small business owners who manage their own websites because, for example, they may not have the budget to hire a professional web design agency.
The problem is that these images are usually much larger and heavier than a website actually needs.
Think about what happens when you visit a website. Your browser has to download all the files required to display the page on your screen:
- HTML files
- CSS stylesheets
- JavaScript files
- Fonts
- Images
Every one of these files takes a certain amount of time to download.
The basic rule is therefore quite simple:
The smaller the files, the better.
When images are not properly optimized, they are usually physically larger than necessary and have an excessive file size measured in kilobytes or megabytes.
This can cause several problems:
- The website takes longer to load.
- Navigation feels slower.
- The user experience gets worse.
- SEO and overall website performance may be negatively affected.
At this point, I think we can agree that optimizing images before uploading them to a website is important.
Now let us look at what image optimization actually involves.
What Does It Really Mean to Optimize an Image for the Web?
When we talk about optimizing an image for the web, we are primarily talking about three things:
- Image dimensions in pixels
- File size and compression
- Image format
Let us look at each one in more detail.
1. Image Dimensions
When I refer to an image’s dimensions, I mean its actual width and height, measured in pixels.
One of the most common mistakes is uploading images that are much larger than the website needs.
For example, many images taken with a modern phone or digital camera can be 4,000 or 5,000 pixels wide.
In most cases, a website does not need an image that large.
The appropriate dimensions will depend on where the image will appear on the website.
For example, there is a significant difference between:
- An image that spans the full width of the screen
- An image placed inside a column or smaller content block
When you upload an image that is larger than necessary, the browser will display it at the dimensions assigned by the website template.
In other words, the browser will resize it, reduce it, or adapt it to fit the available space.
The problem is that the browser still has to download the complete original file.
For example:
- The actual space available for the image is 600 pixels wide.
- You upload a 1,450-pixel-wide PNG image with a file size of 3 MB.
- The browser displays it at 600 pixels wide but still has to download the original 1,450-pixel, 3 MB file.
That makes no sense.
Properly reducing an image’s dimensions can create a significant reduction in file size without noticeably affecting its visual quality—provided you do it correctly.
Keep reading.
2. File Size and Compression
The second key factor is the file size, which is normally measured in kilobytes, or KB, and megabytes, or MB.
Compression reduces the file size by removing unnecessary information without creating a noticeable loss of quality for the user.
This is where you need to find the right balance:
- Too little compression results in unnecessarily large files.
- Too much compression results in visible quality loss.
A properly compressed image should:
- Look good on the screen
- Load quickly
- Avoid visible artifacts, pixelation, or other defects
Applying a moderate level of compression is usually enough to significantly improve website performance.
But how do you compress an image?
For people who are new to the subject, compression is normally managed when you choose the image format and configure its export settings.
Yes, I am going to say it again: keep reading.
3. Image Format
The third factor is the image format.
Traditionally, PNG and JPG have been two of the most commonly used image formats on the web. Each format was designed with certain types of images in mind:
- JPG: Ideal for photographs, including landscapes, portraits, and product photos.
- PNG: Useful for graphics that require transparency.
These formats were the standard choices for many years. They are still valid, but they are not always the most efficient options available today.
In fact, I would almost tell you to forget about them for a moment and pay attention to what comes next.
In recent years, an image format created specifically for web use has become increasingly popular: WebP.
Among other benefits, the WebP format allows you to:
- Create significantly lighter files
- Maintain good visual quality while controlling compression
- Improve performance in most modern browsers
JPG remains a completely valid choice when it is properly optimized, especially when you do not have access to an image editor that supports WebP.
However, when WebP is available, it will often produce better results in terms of file size and loading performance.
With the tool I am about to show you, you no longer have an excuse.
Practical Example: How to Optimize an Image with XnConvert
To summarize everything we have discussed, the basic image optimization process is always the same, regardless of the tool you use:
- Adjust the image dimensions based on how the image will actually be used.
- Apply a reasonable level of compression.
- Select the appropriate image format.
The specific software is not the most important part. What matters is understanding these concepts and applying them correctly.
For this example, however, I will show you how to optimize images for the web using XnConvert.
XnConvert is a free image conversion and processing tool available for Windows, macOS, and Linux. You can download XnConvert from its official website.
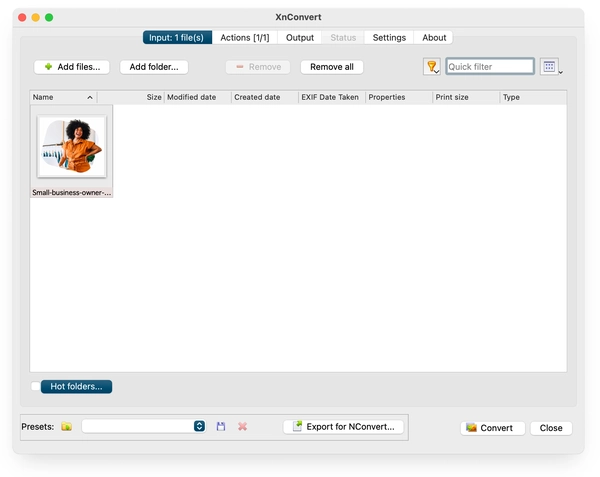
Step 1: Add Your Files to XnConvert
XnConvert allows you to process multiple files at the same time.
In some situations, it is better to edit images individually because each image may need different final dimensions.
However, when you need to optimize a group of images that will all use the same dimensions, XnConvert allows you to process them together.
To add your images, you can:
- Drag and drop the files into the main XnConvert window.
- Click the + Add Files button and select them manually.
Step 2: Create an Action to Resize the Image
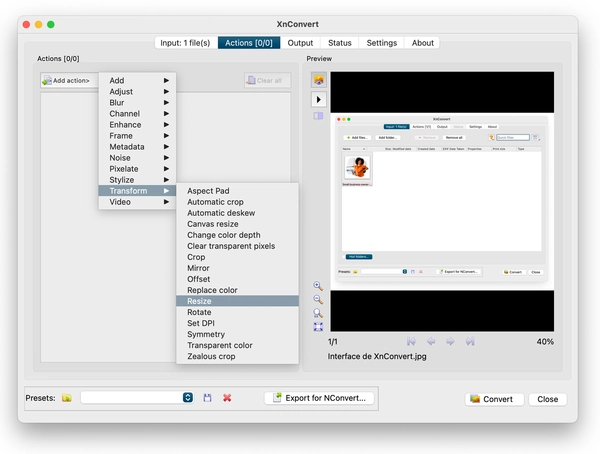
Next, open the Actions tab and click Add Action.
From the dropdown menu, select:
Image → Resize
Depending on the version of XnConvert you are using, this may also appear under:
Transform → Resize
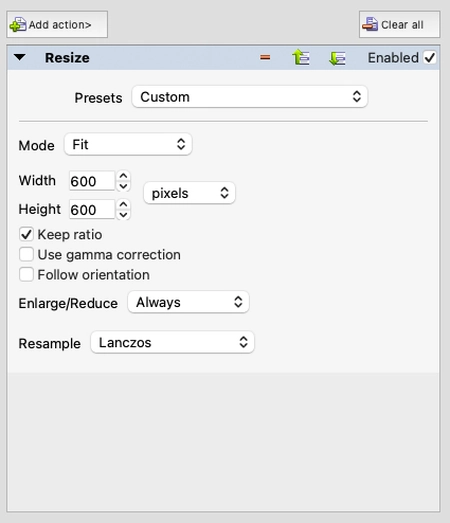
In the resize settings, enter the dimensions you want to apply to the image.
You can specify both the width and the height. However, I usually leave the Keep Ratio option enabled and adjust only the width.
Keeping the original aspect ratio prevents the image from becoming stretched or distorted.
Step 3: Convert the Image to WebP
Now open the Output tab.
First, select the destination folder where you want XnConvert to save the optimized image.
Then locate the Format dropdown menu and select WebP.
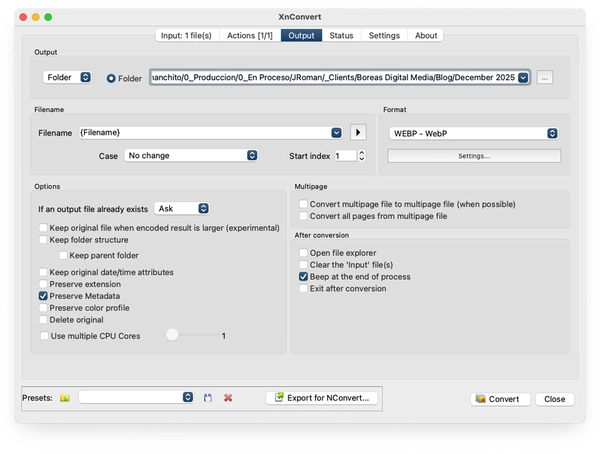
Next, click Settings.
A new window will open with the WebP output settings.
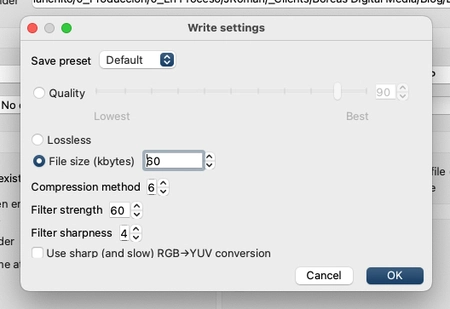
You can manage the compression in two main ways.
Option 1: Adjust the Image Quality
The first method is to select a quality level.
This method is less intuitive when you are trying to predict the final file size. You may need to run a few tests before finding the best balance between quality and file weight.
Option 2: Set a Target File Size
This is my preferred method because it gives me more direct control over the final weight of the image.
I follow a general rule:
- For images placed inside the page that will occupy less than half of the screen, I normally try to keep the file below approximately 80–100 KB.
- For large images that will span the full width of the screen, I normally try to keep the file below approximately 140–160 KB.
These are not absolute limits. The appropriate file size will depend on the image dimensions, level of detail, visual quality requirements, and how the image will be used.
However, they provide a practical starting point for most standard website images.
Once you have configured the output settings, click Convert.
That is it. You now have a WebP image optimized for your website.
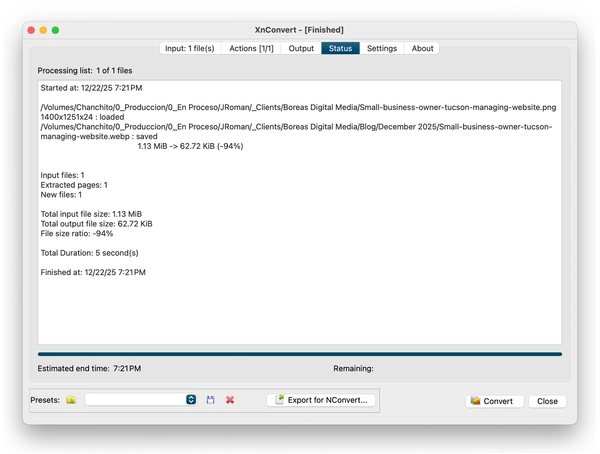
In the results window, XnConvert will show the final file size and the percentage reduction achieved.
In my example, I converted a 1.3 MB PNG file into a 62.7 KB WebP file.
That represents a 94% reduction.
My browser is going to be very happy.
Conclusion
As you have seen, optimizing images before uploading them to a website is a relatively simple process.
However, it can have a major impact on several aspects of website performance, including:
- Loading speed
- User experience
- SEO performance
- Overall website efficiency
The most important thing is to remember the three fundamental steps:
- Resize the image according to its real use.
- Apply an appropriate level of compression.
- Choose an efficient image format, such as WebP.
When you follow this process consistently, you can prevent many of the most common performance problems found on small business websites.
You also avoid forcing your visitors’ browsers to download enormous image files for no good reason.
And honestly, browsers already have enough work to do.